
You will also see how artwork, stitch types, file formats, and test stitching improve embroidery quality.
Choose Absolute Digitizing for reliable, high-quality hat digitizing support.
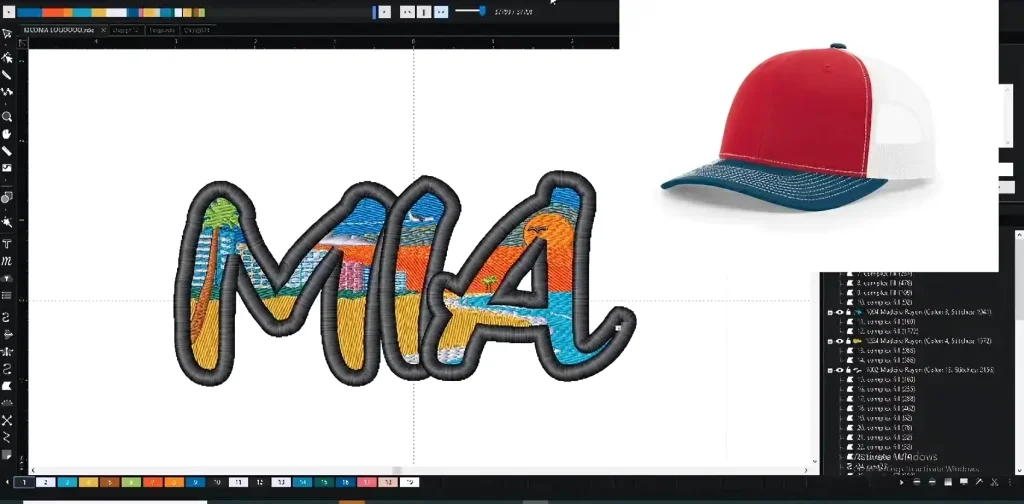
Custom hat embroidery starts long before the machine begins to stitch. First, a design must go through embroidery digitizing. This process turns artwork into a stitch file that the embroidery machine can read. For hats, this step matters even more because caps have curves, seams, and tight spaces.
Furthermore, a design that looks great on a screen may not stitch well on a hat without the right planning. Good hat digitizing helps create clean, sharp embroidery. It improves stitch quality, reduces mistakes, and helps the final design last longer.
So, when you understand the basics, you can make better choices about your design, hat style, and file setup. This also helps you avoid common problems like poor coverage, uneven text, or puckering. If you want strong results with less trial and error, choosing a reliable embroidery digitizing service can save time and protect your design quality.
- What Are the Key Aspects of Hat Digitizing?
- Types of Underlay Stitches
- Hat Material and Structure
- How Does Cap Digitizing Work Step by Step?
- Why Is Embroidering a Hat Considered Challenging?
- Which Best Practices Improve Hat Embroidery Digitizing?
- How Can You Avoid Common Pitfalls in Hat Digitizing?
- Which File Formats Are Needed for Custom Hat Digitizing?
- How Much Does Custom Hat Embroidery Typically Cost?
What Are the Key Aspects of Hat Digitizing?
Hat digitizing depends on a few key factors. Each one affects stitch quality, design clarity, and how well the embroidery performs on a curved cap.
Design Size and Placement on a Hat
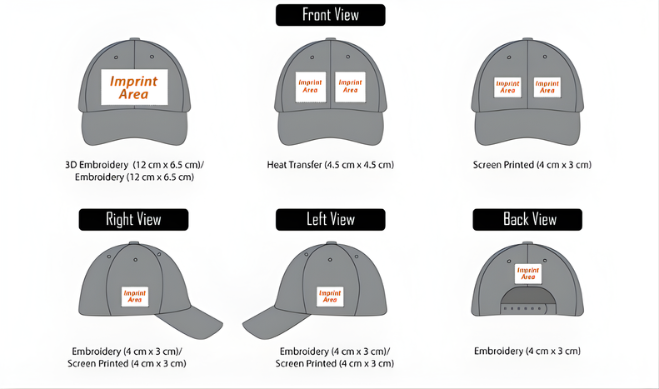
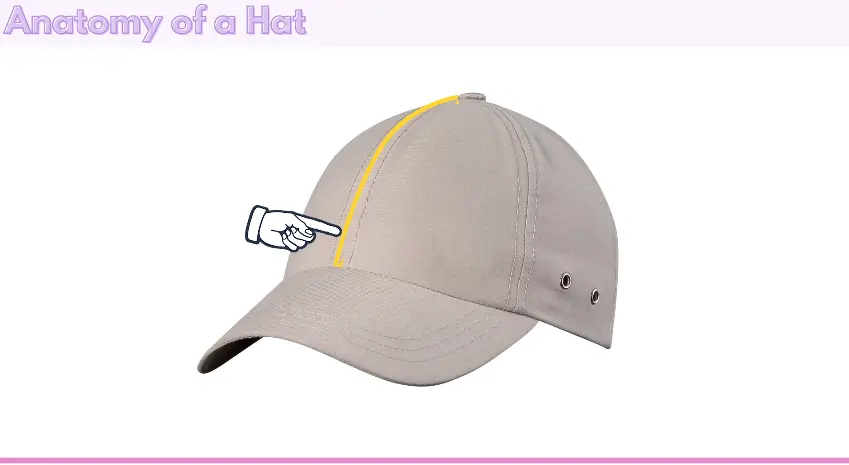
Hats offer less space than shirts or jackets. The front panel is the most common area for embroidery, but it is also the most challenging. Also, the side and back of a hat are popular for small logos, names, or extra branding. Front-center designs must work around the middle seam, which can affect fine detail and small text. A smart design must fit the hat shape and stay easy to read.
Important placement points include:
- Front panel embroidery needs careful sizing
- Side embroidery works well for small details
- Back embroidery is often used for names or short text
- Center seam placement can affect clean stitching
Stitch Direction and Design Flow
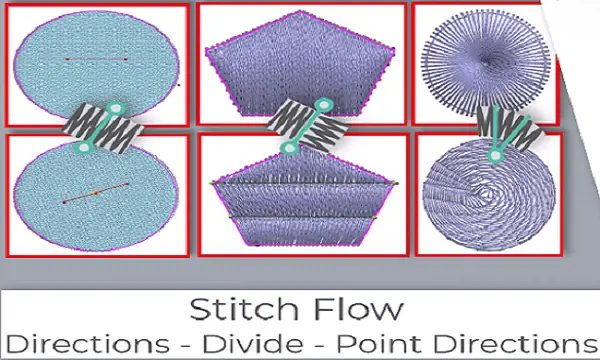
Stitch direction means the path the stitches follow. It matters a lot on a curved hat’s surface. Good stitch flow helps the design look smooth, balanced, and neat. Poor stitch direction can lead to gaps, uneven coverage, or a distorted shape. So, that is why hat digitizing needs careful planning instead of a basic file conversion.
A digitizer must think about the following:
- How the stitches move across the curve of the cap
- Where the design starts and ends
- How each section connects to the next
- How to reduce stress on the fabric
Underlay, Density, and Pull Compensation
Underlay
The underlay is the base layer of stitches under the top stitching. It provides support and helps the design stay stable.
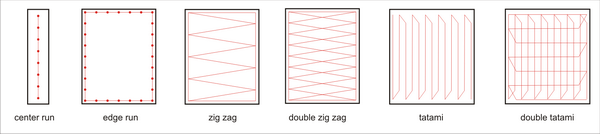
Types of Underlay Stitches
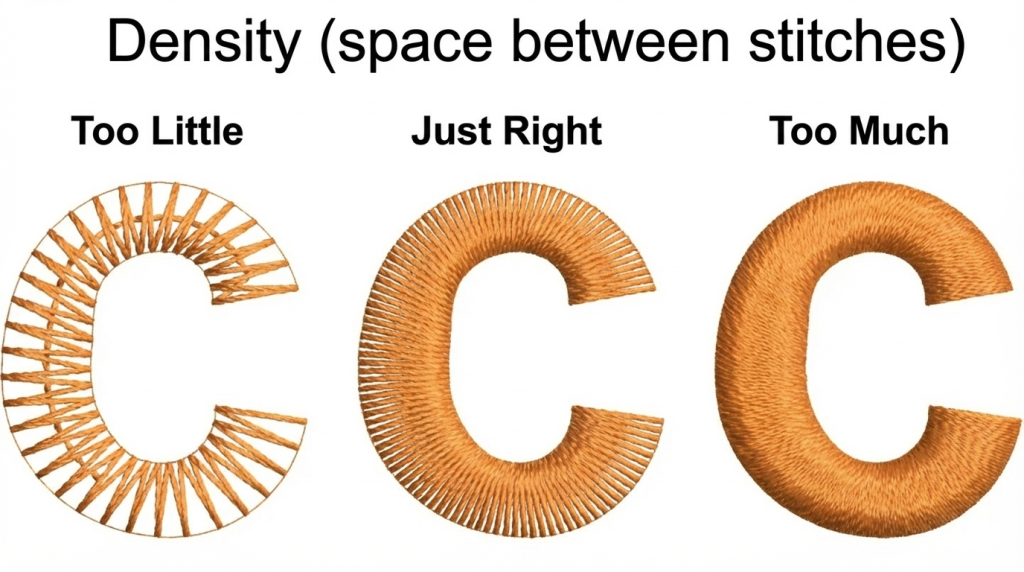
Stitch density
Stitch density means how close the stitches are packed together. So, if stitches are too tight, the design may look stiff and heavy. Also, if they are too loose, the fabric may show through.
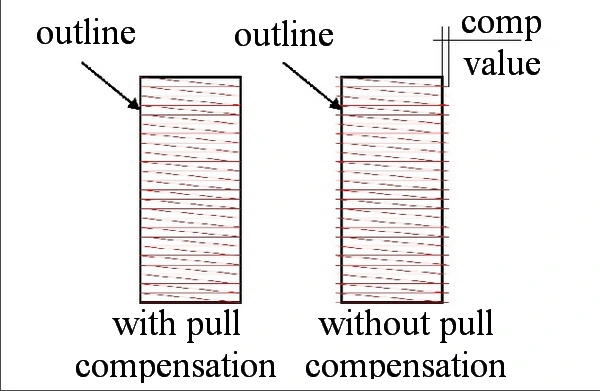
Pull Compensation
Pull compensation is a small adjustment that helps the design keep its shape when the fabric shifts during stitching.
These settings help improve quality by:
- Supporting the top stitches
- Keeping edges clean
- Reducing fabric movement
- Helping the design stay balanced
Hat Material and Structure
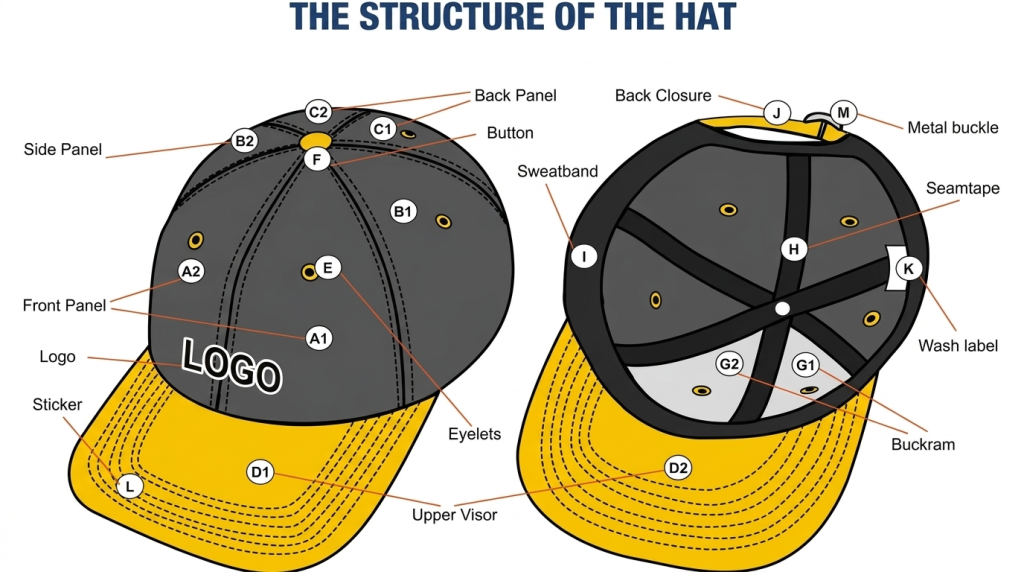
Not all hats behave the same way. Cotton caps, trucker hats, foam fronts, and structured caps all respond differently during embroidery. A soft cap may shift more while stitching. A structured cap may hold the design better. The fabric type, thickness, and overall shape all affect how the design should be digitized.
Common material factors include:
- Cotton caps may need balanced density
- Trucker hats often have mesh that limits placement
- Foam fronts can support bold designs
- Structured caps usually hold shape better during stitching
| Key Factor | Why it Matters for Hat Digitizing |
|---|---|
| Design size and placement | Helps the design fit the cap and avoid seam problems |
| Stitch direction | Keeps the embroidery smooth on curved surfaces |
| Underlay and density | Supports the design and improves stitch coverage |
| Pull compensation | Helps the design stay balanced during stitching |
| Hat material and structure | Changes how the cap handles stitches and tension |
How Does Cap Digitizing Work Step by Step?
Cap digitizing follows a clear step-by-step process. Each step helps turn artwork into a clean embroidery file that fits the hat shape and stitches well.
Step 1: Review the Artwork
Cap digitizing starts with the artwork. It may be a logo, text, or image. The digitizer checks the design first. Clean artwork gives better results. Tiny details, thin lines, and very small text often need to be simplified. This helps the design stitch clearly on a hat.
Important checks in this step:
- The logo or text is clear and easy to read
- Small details are reviewed before digitizing starts
- Thin lines are adjusted if they are too fine for the thread
- The design is sized for the hat area
Step 2: Choose the Best Stitch Types
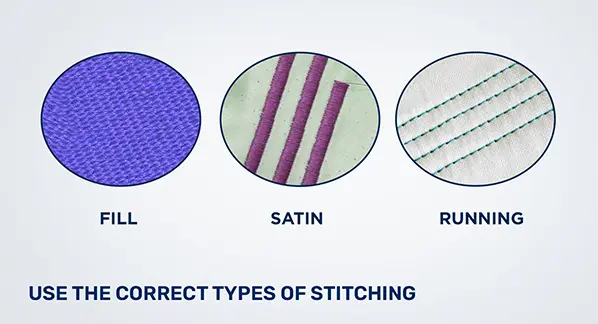
Next, the digitizer selects stitch types. Satin stitch works well for letters and clean edges. Fill stitches cover larger areas. Running stitch suits fine outlines and light details. Each stitch type has a purpose. The right choice helps the design look neat.
Common stitch choices include:
- Satin stitch for text and sharp edges
- Fill stitch for larger solid sections
- Running stitch for outlines and fine detail
- Mixed stitch is used for balance and clarity
Step 3: Set the Stitch Direction and Sequence
The digitizer then sets the stitch direction and order. This step is crucial for hats. Good stitch flow keeps the design smooth. The right sequence reduces thread breaks and helps the design hold its shape.
This step helps by:
- Creating smooth stitch flow
- Lowering the chance of thread breaks
- Keeping sections aligned
- Helping the finished embroidery look clean
Step 4: Adjust for Hat Shape and Fabric
Hats are not flat, so extra planning is needed. The digitizer adjusts for the curve, center seam, and fabric thickness. Different cap styles behave differently. This is where Absolute Digitizing adds real value with careful hat-specific planning.
Main adjustments may include:
- Planning around the center seam
- Adjusting for thick or soft materials
- Setting the design for curved surfaces
- Matching the file to the cap style
Step 5: Export the Correct Machine File
Once the design is ready, the file is saved in the format the embroidery machine needs. Common embroidery file formats are PES and EXP. The correct file format helps the machine read the design the right way and stitch it without problems.
At this stage, the digitizer makes sure:
- The file matches the embroidery machine
- The design settings are saved correctly
- The stitch data is ready for production
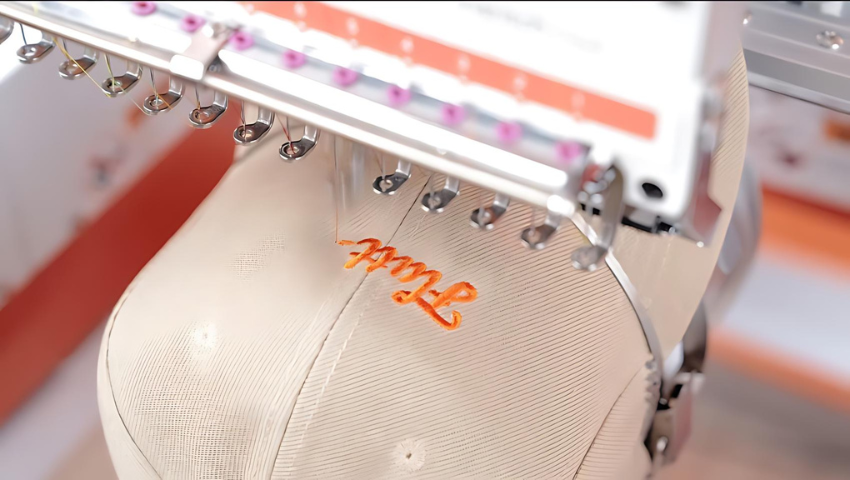
Step 6: Run a Test Stitch
The last step is a test stitch. This sample run shows how the design works on the actual hat. Testing helps catch gaps, puckering, or poor letter clarity before full production begins. It saves time and helps avoid waste.
A test stitch helps check:
- Letter clarity
- Stitch coverage
- Design balance
- Problems like puckering or gaps
| Step | What happens | Why it matters |
|---|---|---|
| 1 | Review artwork | Helps remove details that may not stitch well |
| 2 | Choose stitch types | Matches each design part with the best stitch |
| 3 | Set direction and sequence | Reduces thread breaks and keeps the design clean |
| 4 | Adjust for hat shape | Helps the design work on curved cap surfaces |
| 5 | Export file format | Makes the file ready for the machine |
| 6 | Test stitch | Finds problems before full embroidery starts |
Why Is Embroidering a Hat Considered Challenging?
Embroidering a hat is harder than embroidering a flat shirt or jacket. A hat has a curved shape, a firm front, and often a center seam. These features make stitching more difficult. The hooping process is also trickier because the cap must stay tight and stable during embroidery. If it shifts, the design can look uneven. Hats also have less space, so small text and fine details may not stitch well.
The main challenges include:
- Curved surfaces that affect stitch flow
- Center seams that can distort the design
- Tight hooping requirements for clean results
- Limited space for text and small details
- Different cap materials that react in different ways
That is why many businesses trust Absolute Digitizing for cleaner and more reliable hat embroidery files.
Which Best Practices Improve Hat Embroidery Digitizing?
Good hat digitizing starts with smart planning. A clean design, the right stitch settings, and proper cap adjustments all help create sharp embroidery. Simple artwork usually works better on hats than crowded designs. Good digitizing also lowers the risk of thread breaks and uneven stitching.
Best practices include:
- Keep text clear and avoid very tiny details
- Use the right stitch type for each part of the design
- The right stitch type for each part of the design
- Set proper stitch direction for curved hat surfaces
- Adjust density to avoid heavy or stiff embroidery
- Add the right underlay for support and stability
- Test the design on the same hat style when possible
For clean, cap-ready files, many brands choose Absolute Digitizing for a more reliable result. Choose speed, precision, and quality with Absolute Digitizing!
How Can You Avoid Common Pitfalls in Hat Digitizing?
Hat digitizing can go wrong when the file is not planned for a cap. Common problems include design distortion, poor registration, and thread tension issues. The best way to avoid them is to keep the design simple and adjust the file for the hat’s shape and seam. A test stitch also helps catch problems early.
To avoid common issues:
- Simplify small text and tiny details
- Set proper stitch direction for curved caps
- Use balanced density to reduce tension problems
- Add underlay to support the design
- Check registration so colors and shapes line up
- Test the file before full production
For expert help, contact Absolute Digitizing.
Which File Formats Are Needed for Custom Hat Digitizing?
Custom hat digitizing uses two kinds of files. The first is the design file sent by the customer. The second is the machine file used for embroidery. Clean source files help the digitizer create a better stitch file.
Common file formats include:
- AI, EPS, and SVG for clean vector artwork
- DST for many commercial embroidery machines
- PDF, PNG, and JPG for logo or image reference
- JEF for Janome machines
- PES for Brother and Babylock machines
- EXP for Melco machines
Source files show the design. Machine files tell the embroidery machine how to stitch the hat.
How Much Does Custom Hat Embroidery Typically Cost?
Custom hat embroidery cost depends on both digitizing and production. A simple design usually costs less than a detailed logo with a high stitch count. Order size also affects the final price.
Common cost factors include:
- Stitch count
- Number of thread colors
- Hat style and material
- Order quantity
- One-time digitizing fee
Bulk orders often lower the price per hat.
Why Should You Choose Custom Digitizing for Hat Embroidery?
Custom digitizing gives hats a better fit, cleaner detail, and stronger stitching results. Also, it works way better than auto-digitizing because each design is planned for the cap’s shape, seam, and fabric. That means fewer mistakes and a polished finish.
Choose Absolute Digitizing for
- A reliable partner for every order
- Quality digitizing made for hats
- Clean files with better stitch results
Our Customer Services Include
- Instant free quotes
- 2 -to 12 hour turnaround
- Rush orders in 2 hours
- 24/7 live chat support
- Free revisions
- Your satisfaction or a full refund
Conclusion
Custom hat embroidery digitizing needs the right file, the right stitch plan, and the right cap settings. In this guide, we covered key aspects of hat digitizing, the step-by-step process, best practices, common mistakes, file formats, costs, and why custom digitizing gives better results.
So, when digitizing is done well, it helps hats look clean, sharp, and professional. If you want to try digitizing or need expert help, contact Absolute Digitizing for reliable and high-quality digitizing solutions.
FAQs
Can I use a PNG file for hat embroidery?
A PNG file can help as a reference image, but it cannot run on an embroidery machine by itself. The design still needs to be digitized into a machine file.
Why does a hat design need its own digitized file?
Hats have curves, seams, and less space than flat garments. A custom digitized file helps the design fit the hat and stitch more cleanly.
What is the best file format for embroidery machines?
The best file format depends on the machine. DST is one of the most common formats, but some machines also use PES, EXP, or JEF.
How much does hat embroidery digitizing cost?
The cost depends on design size, stitch count, and detail level. Simple hat digitizing usually costs less than detailed or complex designs.